Data Management Administration
As a Security Administrator, you’ll use the Data Management Console to recall files, modify access, add users, and add policy![]() Rules associated with a protected payload that designate which users can access the encrypted file, from what locations, and for what time periods. requirements on all the protected
Rules associated with a protected payload that designate which users can access the encrypted file, from what locations, and for what time periods. requirements on all the protected![]() The process of encrypting a file and tying access policies to it so that authorized users can access the data securely based on restrictions set by the data owner. data a user has created.
The process of encrypting a file and tying access policies to it so that authorized users can access the data securely based on restrictions set by the data owner. data a user has created.
You can also drill down into the details of a protected file to view the:
-
Chain of Custody Events: Entire lifecycle of Keyavi-protected data from creation to every access attempt. It helps you understand how your data is being accessed and how it’s protecting itself. The list shows the:
-
Name of the user who took the action
-
Date and time of action
-
Type of action attempted
-
Status
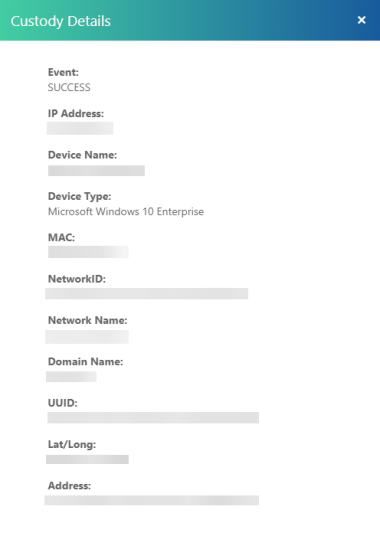
You can drill down even further for details like the IP address, MAC address, UUID, and device name. For more details, View Chain of Custody Events.
-
-
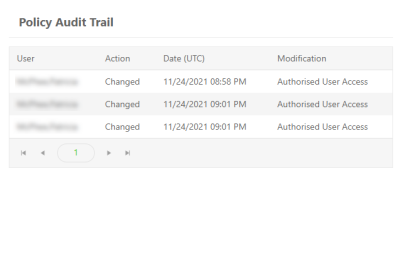
Policy Audit Trail: Every change to user access and policies made to the IKD file. The list shows:
-
Who made the change (you, the data owner)
-
Action
-
Date and time
-
Modification date
-
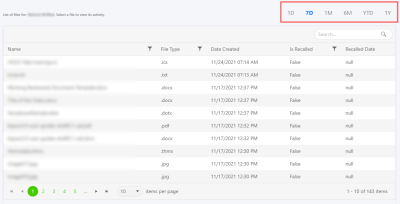
Search for a File
You can search for a file by filtering on File Type, Date Created, or Recalled Date, and drill down further by a timeframe:
-
1D - the last day (24 hours)
-
7D – the last week
-
1M – the last month (30 days)
-
6M – the last six months
-
YTD – January 1st of the current year to the current date
-
1Y – the last year
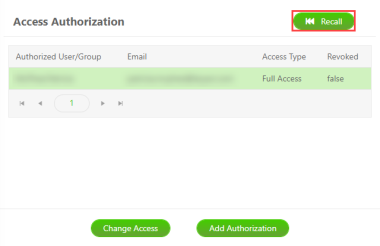
Revoke a File
When you recall a file, you prevent a previously authorized recipient access to the data.
-
Select Data Management from the left navigation.
-
Search for and select the file you want recalled. The Data Management Detail window opens.
-
From the Access Authorization panel click Recall.
-
The file gets recalled immediately.
Reinstate a File
You can also reinstate access to a file that you had previously revoked.
-
Select Data Management from the left navigation.
-
Search for and select the file you want access reinstated.
-
From the Access Authorization panel, select the recipient from the list, and click Un Recall.
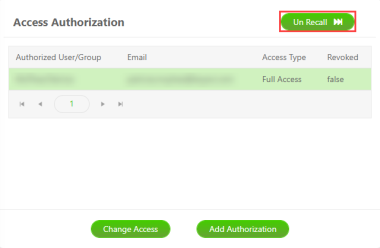
The file gets reinstated immediately.
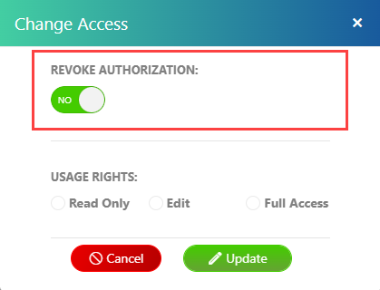
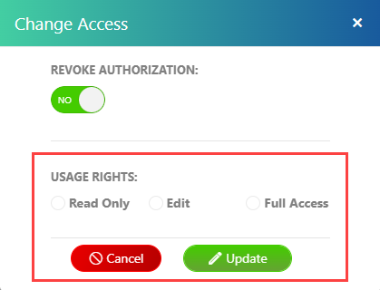
Revoke Authorization to a File
You can revoke access to a file.
-
Select Data Management from the left navigation.
-
Filter for and select the file you want access revoked on.
-
From the Access Authorization panel, select the recipient from the list, and then select Change Access.
-
Toggle Revoke Authorization to Yes. Then select Update.
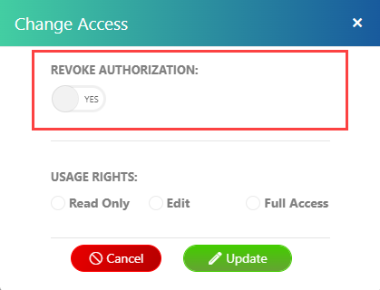
Reinstate Authorization to a File
You can also reinstate access to a file you previously revoked.
-
Select Data Management from the left navigation.
-
Search for and select the file you want access un-revoked.
-
From the Access Authorization panel, select the recipient from the list, and click Change Access.
-
Toggle the Revoke Authorization to NO. Then click Update.
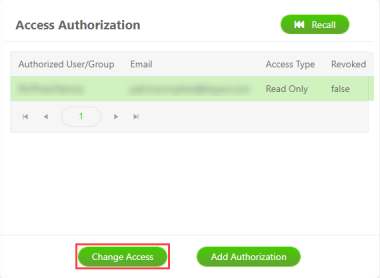
Change Access Rights to a File
You can change usage rights to a file even after sharing the data.
-
Select Data Management from the left navigation.
-
Search for and select the file you want to modify.
-
From the Access Authorization panel, select the recipient from the list, and then click Change Access.
-
Select the USAGE RIGHTS you want to give and then click Update.
Individual user rights take precedence over rights determined through group membership.
|
Authorization Mode |
Description |
Keyavi Application |
File Type |
Permitted Action |
|---|---|---|---|---|
| Read-only | File opens |
All | Over 150 file types are supported. | Read |
| Edit | File opens in a protected view with limited editing capabilities. | Keyavi for Windows |
|
|
| Full Access | File opens in its native application. |
|
All file types. |
|
Add a New User to Access a File
As authorized users change over time, for example, new members joining the team, you can add them to access the file.
-
Select Data Management from the left navigation.
-
Search for and select the file you want to modify.
-
From the Access Authorization panel, click Add Authorization.
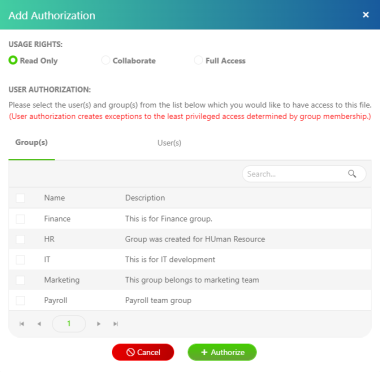
-
Select the USAGE RIGHTS you want to give.
 User rights and access levels
Individual user rights take precedence over rights determined through group membership.
Authorization Mode
Description
Keyavi Application
File Type
Permitted Action
Read-only File opens in a protected view without editing capabilities. All Over 150 file types are supported. Read Edit File opens in a protected view with limited editing capabilities. Keyavi for Windows - Microsoft Word (.docx)
- Microsoft Excel (.xlsx)
- Text (.txt)
- Read
- Edit (including cut, copy, and paste)
- Save changes to protected copy
Full Access File opens in its native application. - Keyavi apps
- Keyavi Web
All file types. - Read
- Edit (including cut, copy, and paste)
- Save unprotected copy
- Screen share
- Screen capture
-
Select the user(s) and/or group(s) you want to provide access to and then click Authorize.
If you don't see the user listed, contact your Keyavi administrator.
Update the File-level Geolocation
You can change the authorized geolocation![]() The ability to track a device’s physical whereabouts down to latitude and longitude coordinates, or more practically, a physical address, using GPS, cell phone towers, WiFi access points and IP address lookup, or a combination of these. of a protected file.
The ability to track a device’s physical whereabouts down to latitude and longitude coordinates, or more practically, a physical address, using GPS, cell phone towers, WiFi access points and IP address lookup, or a combination of these. of a protected file.
-
Select Data Management from the left navigation.
-
Search for and select the file you want to update.
-
Above the Access panel, click Authorized Locations.
-
Define a location using one of these two methods:
-
Enter a city, address, or zip code in the Location search, and then select the matching location. Show me

The remaining fields populate with relevant details.
-
Using decimal degrees, enter the latitude and longitude coordinates Lat,Long. Show me

While the number of decimal places you use in the coordinates affects the precision of the geolocation protection, Keyavi checks only the first four digits of the user's location when evaluating access locations.
The remaining fields populate with the geolocation details for the entered coordinates.
-
-
In Location Name, enter a name to identify the location.
-
If you want this policy to apply to one user only, in User, select the user to apply the policy to.
-
Click Save Location.
Update the Access Time of a File
You can change the access time frame![]() A specific window of time when access is allowed to a file. The time frames can be open-ended, so you can set just a beginning date and time or ending date and time. of a protected file.
A specific window of time when access is allowed to a file. The time frames can be open-ended, so you can set just a beginning date and time or ending date and time. of a protected file.
-
Select Data Management from the left navigation.
-
Search for and select the file you want to update.
-
In the Access panel, select the calendar icon and clock icon for:
-
Access Start Time - Earliest date and time the data becomes accessible to authorized users. The start date should be before the end date.
-
Access End Time - Expiration date and time the data becomes inaccessible to authorized users. The end date should be after the start date.
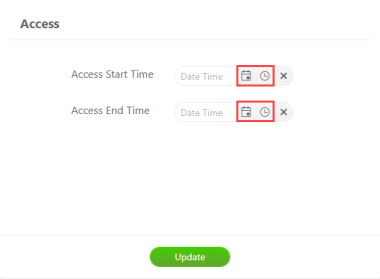
To clear the start and end times, click the X to the left of the calendar and time icons.
-
-
Click Update.
View Chain of Custody Events
You can view the entire lifecycle of Keyavi-protected data from creation to every access attempt to help you understand how your data is accessed and how it's protecting itself.
-
Select Data Management from the left navigation.
-
Search for and select the file you want to view.
-
From the Chain of Custody Events panel, click Details for the event you want to view to drill down further into the event.
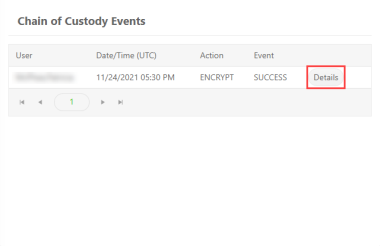
The Custody Details window opens.