Protect Files on Mobile
You can secure any data file type, locally or in the cloud. Add multiple layers of encryption![]() The process of protecting a file and tying access policies to it so that authorized users can access the data securely based on restrictions set by the data owner. to your data by applying policy
The process of protecting a file and tying access policies to it so that authorized users can access the data securely based on restrictions set by the data owner. to your data by applying policy![]() Rules associated with a protected payload that designate which users can access the encrypted file, from what locations, and for what time periods. rulesets that define who can access the data, where, and when. For example, as the data owner
Rules associated with a protected payload that designate which users can access the encrypted file, from what locations, and for what time periods. rulesets that define who can access the data, where, and when. For example, as the data owner![]() A user that encrypts the file with Keyavi and maintains control of that data throughout its lifecycle from the Data Management Console., you can add geolocations, grant access to users, and define access duration.
A user that encrypts the file with Keyavi and maintains control of that data throughout its lifecycle from the Data Management Console., you can add geolocations, grant access to users, and define access duration.
Protecting a file requires some free space on your device. If your device does not have enough available storage, Keyavi shows an error message. See Free Up Space or Add Additional Storage for suggestions to free up space.
Protecting Files
You may protect![]() The process of encrypting a file and tying access policies to it so that authorized users can access the data securely based on restrictions set by the data owner. a file stored locally on your device or in the cloud by using these steps.
The process of encrypting a file and tying access policies to it so that authorized users can access the data securely based on restrictions set by the data owner. a file stored locally on your device or in the cloud by using these steps.
If you're logging in with Microsoft, Google, or Apple credentials, you won't have access to the Protect or Manage menus.
-
Tap
 or open the menu
  , and then tap Protect.
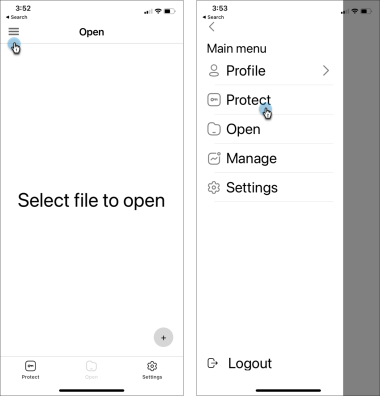
-
On the Protect page in Keyavi, tap Protect a new item, and then select the file you want to protect.

-
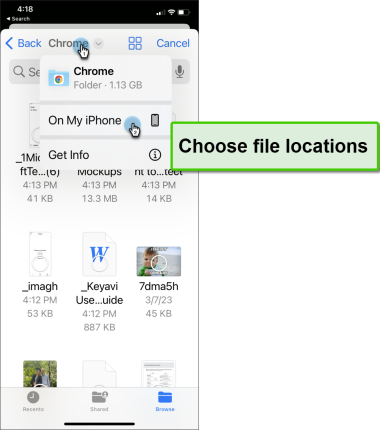
Use the menu at the top to locate file locations on your device.
-
Select the files to protect, and then tap Open.

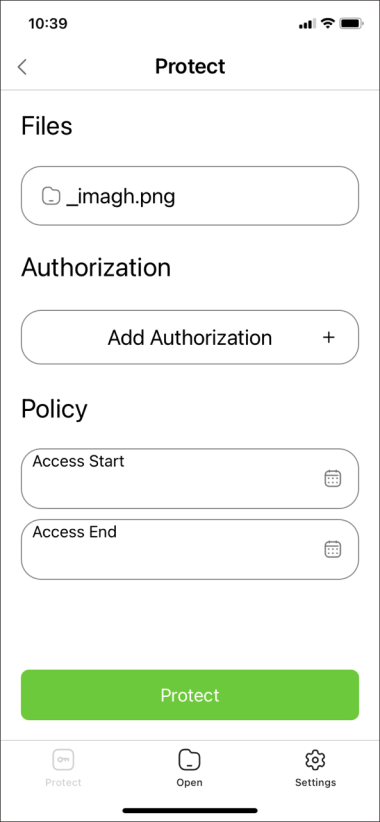
After selecting a document or folder to protect, Keyavi shows the files on the Protect screen where you can add authorized users or groups , add a time embargo, select more files, or protect the file so only you have access.
-
Add authorized users or groups:
-
Tap Add Authorization.
-
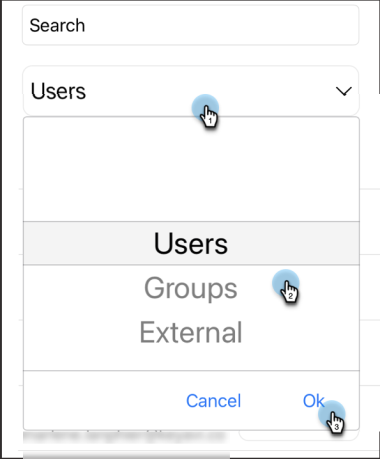
Tap the Users list, select the user type (Users, Groups, or External), and then tap OK.
-
Search or scroll for the user or group.
-
After you find a user or group, select the access level (e.g., Read-only or Full Access), and then tap Done.

-
-
Add a restrictive time period—also called time embargo—for when access to data begins and expires. For example, you can limit access to before and after a business meeting. Click Select Policy.
-
In Access Start, select the calendar icon to set the earliest date and time the data becomes accessible to authorized users. Then tap OK. The start date must be before the end date.
-
In Access Ends, select the calendar icon to set the expiration date and time the data becomes inaccessible to authorized users. Then tap OK. The end date should be after the start date.

-
-
Tap Protect.
-
Send or save the Keyavi-protected file using your device's sharing features. Unauthorized users can't access the file and will get a message with the option to request access.